

Drone Piloting 101
I learned the hard way so that you don’t have to.
CC BY-SA 4.0Last updated: 2026/06/02
Material is based upon the DJI Mini3, Mini4 & Mini5 Pro platforms. All affiliate links within benefit the development of this document.
Intro
A successful drone mission can involve mitigation of many factors. A single element can be the difference between success and failure.
Batteries
Batteries are extremely important when it comes to drones. This section is first because your foremost task will be managing, charging and cursing batteries.
<inspect battery for fit, does it feel firm in the drone? are any of the clips damaged/cracked?
<How to view cycle count, various messages: too many cycles>
Tips: Batteries
- Label your batteries!
- Lion Batteries are programmed to discharge over time . Always pre-charge all of your batteries before a mission to bring them to 100%! Never assume your batteries are fully charged.
- Number your batteries and write their cycle count on the shell from time to time.
- Stripe your battery usage across your batteries with a goal of keeping the cycle count uniform.
Battery Lifetime
After about 200 flights the controller will warn that you’re approaching EOL for the battery. These batteries will continue to work but are getting to a point where they probably shouldn’t be trusted . ‘
Older Batteries
Batteries with high cycle counts can be kept as backups or be used in the smart charger to power devices on the ground. Batteries appearing swollen are a fire hazard and should be discarded.
Charging
The drone itself is a charger & the official DJI 3 way charger charges batteries serially, in priority of least charged batteries first.
3rd party battery fast chargers that can charge in parallel are also available.
Other Equipment
Controllers
RC vs RC2, RC3 . Both work fine. You can’t load 3rd party software onto a RC2 or RC3 controller. You’ll need to load that software onto a dedicated android app and use a usb cable to connect to the ‘headless’ controller.
<consider buying a dedicated phone or tablet for that purpose. The embedded RC{2,3} controller reduces factors but that option may not be always available.>
The MODE switch can stick sometimes on certain controllers, so verify that the DJI Fly app agrees with the actual switch position. My RC2 will sometimes stay in NORMAL mode when SPORT mode is selected.. This can be very dangerous when obstacle detection kicks in while trying to launch out of a constricted space. Verify that you’re actually in SPORT mode when the switch is pushed to the right.
<Controller spare phone. You can always fly via controller if phone disconnects . Controller cant supply enough battery to phone risk>
Landing pad
This is something that sounds optional but is actually pretty important! Ensure that your landing pad is level, especially when the ground is wet, dirty or snow covered. You don’t want your drone sliding sideways upon landing. Don’t find yourself like me in a damp forest trying to find a suitable takeoff location.
I really like this LED landing pad for day and night use.
Lanyard
Your hands are going to be full as a pilot. Your drone is expensive and much more fragile than the contoller and you’ll want your free hands dedicated to that. You’re also less likely to bump the sticks during a long shot if you aren’t touching the controller! This is a cheap item to purchase well worth the money.
Props
Props are easily damaged so always have a spare set on hand. This holds especially true in extreme colds where plastics become brittle. The tip of each screw thread should have a tiny dab of blue thread-locker. I’ve never personally seen these screws loosen on their own.
Aftermarket props more durable but dont let them get too banged up. The DJI OEM props have batch numbers engraved on each and should be installed together from the same batch.
The OEM props are a bit more delicate than those sold by Master Airscrew, but also more forgiving in terms of injury. The props can easily draw blood from your fingers..
Tips: Prop installation
- Be careful not to cross thread the hardened steel screws into the soft aluminum drone body. If you feel any resistance you’re likely doing something wrong!
- Each prop should have a tiny dab of blue thread locker on the end.
Prop Guards
<Purpose, pros and cons, when to use.>
The Mini 3 and Mini 4 utilize 2 piece clip on prop guards, where the Mini 5 has an option to add quick release prop guards which can be installed in a few minutes with no tools. These stack neatly together with magnets when not in use.
Filters
<when do use, when not to use, benefits, drawbacks, types. motion blur, getting into the air with dirty filters is disheartening>Conditions
Wind
The wind is a major factor in flying aircraft or drone.
Its important to trust your gut. Don’t fool yourself. When in doubt, don’t fly! This is a great general aviation video demonstrating when to trust you gut .
Tips: Windy Days
- Look to weather forecasts, flags, treetops and other visual indicators for cues
- Don’t forget satellite maps along with radar. This is especially useful for predicting cloud cover.
- Before and after storms is often the most beautiful time to fly, so be ready for small windows even if the forecast isn’t great!
- Fly into the wind in extreme conditions to ensure your ability to RTH
- Some areas such as beaches may have high winds only at the surface.
- Wind speeds often increase at higher altitudes.
- Conditions can change quickly, your pre-flight may not be enough
- High winds can impact the ability of the gimbal to maintain a stable view. In these cases use the controller alone and visual cues to bring the aircraft down safely
Moisture
Despite your best intentions, your drone will eventually encounter some moisture.
Tips: Drying your drone
- Run the props as much as possible in the weather, including before takeoff and after landing
- Wipe surfaces with a clean, dry microfiber cloth.
- Remove the battery and SD card and set them aside
- Use cotton swabs for sensors and hard to reach areas
- Run a hair dryer on cool mode to blow away remaining moisture
- Set the aircraft away in a dry, safe location for several hours
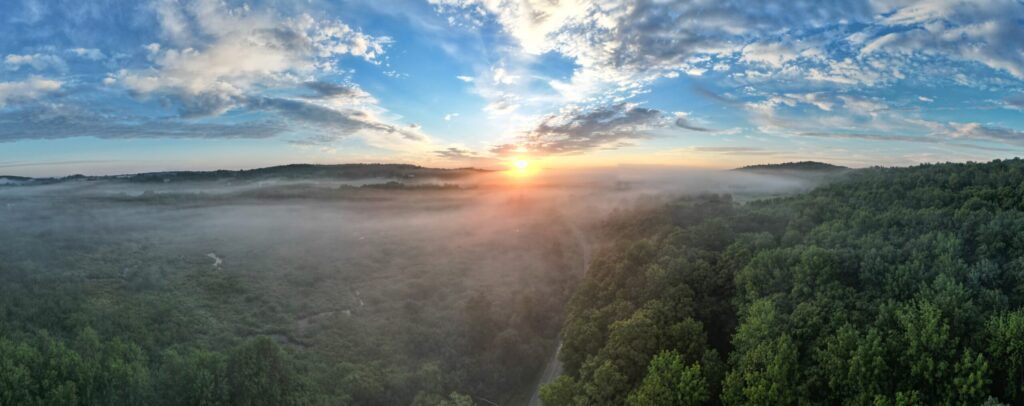
Fog, Clouds, Mist
(Visibility, sensors, moisture, height, breakout, pro mode, timelapse)
Snow
You likely shouldn’t be flying in the snow. This is risky territory and unexpected results can occur.
Risks
Brittle plastics, overloaded gimbals, undefined behaviors, fastly depleting batteries, confused sensors; snow flying has it all!
“The DJI Mini 3 Pro and Mini 4 Pro are officially designed to operate in temperatures as low as -10c (14f). While they can operate in these conditions, it is crucial to ensure the battery is warmed to at least 20°C (68°F) before takeoff and to expect significantly reduced flight times due to battery voltage sag in the cold.”
Sensors
Snow can convince sensors to see things that don’t exist. You may see phantom radar objects above or below. The aircraft may think its closer to the ground that it actually is, which can complicate landing.
Metering
Snow will trick your camera into underexposing your content! Your camera will attempt to make everything in the scene gray. As a rule, always meter up 2 full stops when shooting snow scenes (+2 EV).
Shutter Speeds
Fast shutter speeds are a consideration to catch falling snowflakes with definition. In this case it might be useful to gradually increase the ISO until you can max out the shutter speed. This comes at a loss of some photo detail.
Tips: Snow and cold
- Preheat your batteries
- Precool your drone; sit the drone in a cold area without a battery to allow the camera to acclimate to the change in temperatures
- Turn the drone on indoors and preflight as much as possible
- Wet vs dry snow..
- Update your metering settings at least 1 stop up, preferably 2 (EV +1)
- Prepare your dry landing pad and sit it outside right before takeoff.
- Start your props immediately on the landing pad but don’t takeoff. This keeps the snow off the motors and body by the prop wash
- Give yourself a lot of buffer in remaining battery time when deciding to come home. Batteries behave strangely in cold temperatures
- Consider wearing gloves if applicable
Night Time
(Intro)
This lightweight led strobe works well in my experience.
Lighting landing pad.
Using the auxiliary led
Flying
Practice
It will help to find yourself a place where you can practice uninterrupted. A place away from wires, people, animals and signal interference. A practice area free of distractions can help to build confidence.
Mindset
Whether it be drones or general aviation, flying is a perishable skill. Getting out flying regularly is a critical element to build confidence and skills!
Lies you’ll tell yourself
- I’m afraid of losing my drone
- The weather isn’t nice enough
- Its too cold, too hot
- I’m not good enough
- My drone isn’t good enough
- I’m bored of my local area
Just get outside and fly! Even if this means filming a time lapse or going up for 10 minutes to see if there’s anything interesting on the horizon. Half of life is just showing up..
There have been many times I’ve hesitated, only to capture some of my best content. Boredom is a great exercise in working with what you have.
Tips: Inspiration
- Bored of your local airspace? Drive a mile away.
- Experiment with difference settings and angles.
- Shoot from ground level.
- Use a drone feature you’re unfamiliar with .
Flight Planning
- Review maps of the area (in the USA with AirAware)
- Check for TFRs
- Scan airspace for items of concern (prisons, schools, airports, heliports)
- Clean the lens, filters and sensors
- Calibrate the drone & controllers, if applicable
- Check drone, props, battery for damage.
Pre Flight
- Get a stable GPS fix! Lock in more satellites. Losing control due to lost position is a classic way to crash
- Check for obstacles such as people, wires, cables, vehicles & animals.
- Prepare takeoff and landing area in an open space
- Tighten control sticks, unfold antenna, unfold the props, clean your lens and filter
- Configure Return-To-Home height (See also: RTH)
- Start screen recording
- Set camera to Pro mode with fixed ISO and automatic shutter. Doing this enables you to seamlessly switch from Auto to Pro without interrupting your video.
RC1,2
Android
Take off
- Place aircraft on a flat surface, ideally on a landing pad.
- Set takeoff flight mode properly (normal or sport)
- Look around, did you miss any wires?
- Listen for approaching aircraft
- Confirm recording!
- Confirm flight mode!
- Start motors
- Takeoff
In the air
- Set desired mode. Get out of Sport mode unless you really need to fly fast.
- Check your surroundings again
- Understand the minimum heights for the airspace
Tip: Remote missions
- Download maps data beforehand for your drone, mapping software and anything else that requires network access
- A clipboard not only makes you look official but is actually helpful when trying to take notes in a vehicle. Don’t forget pens too!
- Bring Windex and a clean, non soapy microfiber cloth. You can use any clean soft cotton fabric as a last resort for filter cleaning. Cotton swabs are good for getting into tight spots
Navigation
Its important to avoid spatial disorientation. To help yourself get started, insert a step into every move you make.
How to rewire your brain
- Look at the drone.
- Determine which relative direction the aircraft needs to move
- Tell yourself “move <direction>”
- Translate that into controller actions.
- This will become instinct with practice
Learn to read your instruments
- The center of the crosshair is accurate for determining relative distance between obstacles.
- Altitude and distance controls will ideally be stable when hovering. Rapid fluctuations of altitude and distance can indicate that your footage may be jerky or the winds too fierce for flying.
- Obstacle detection is usually accurate
- Learn how your drone and batteries perform under different conditions
Takeoff
(drone is level and will not impact grass or other obstacles. Another reason to use a landing pad. Push up firmly! Not enough lift and drone can fall back to the ground)
Forward motion
Cinema mode
When filming you’ll generally want to fly in Cinema mode. This mode includes obstacle detection and helps to produce smooth footage and minimize mistakes. You can always speed up the footage in post production.
Normal mode
- Includes obstacle detection
- Is a decent tradeoff between Cinema and Sport
Sport mode
- extremely fast
- No obstacle detection!
- Stopping will be degraded with the extra forward motion
Sideways
The goal here is to use subtle sideways controller movements without making the viewer sick.
Backwards
This is dangerous for all drones due to the lack of visibility, especially in those models without rear-facing sensors.
If a scene requires flying backwards, turn around and fly the path in forward to identify any obstacles and get a better feeling for the space you’re operating in.
Preventing Crashes
You’re going to crash if you fly enough. Don’t let this be a discouragement. You should hopefully crash less and less as your skills progress. Get insurance and move on!
You cant crash if you dont fly.
“A superior pilot uses their superior judgment to avoid situations which require the use of their superior skill” — NASA astronaut Frank Borman
Tips: Not crashing
- Dont fly when you’re tired or distracted
- Avoid night flying
- Don’t squeeze in that final flight of the day.
- Don’t panic, use RTH
- Know where you are and be aware of nearby obstacles!
- Fly directly overhead when possible to limit the risk to people and property
- Don’t catch the drone with your hands unless its an emergency
- Get your body in the landing area to better understand and react to obstacles.
Wires
This is a great video about wires and general aviation, however theres a lot to learn here for us as well!
Loss of signal
You generally lose video signal before the control channel. This is an early warning sign to get back closer to home or away from whatever is blocking the radio path.
If this happens dont panic, hit the return to home button and let the aircraft get closer to you.
Flying higher will generally give you a better signal path around hills, trees and obstacles.
Finding your drone
Sooner or later you will lose your drone nearby, but finding it isn’t always as simple as it seems.
- Always record your screen, this may help you visually locate your drone
- Consider flying with a strobe even during the day
- Use the ‘Find my drone’ functionality of your remote as your guide
Return to home
DJI’s Return to Home (RTH) brings your drone back to its takeoff point automatically in emergencies or manually when triggered. .
Set the RTH altitude above the height of the tallest obstacle in your flight area!
To determine this number in a new environment, perform a pre-mission flight and use your instruments to measure the height of obstacles. This is also useful for generating content above the tree canopy with less risk of running into something.
To avoid accidents, always preset the RTH altitude higher than the tallest obstacle in your area (e.g., trees, buildings) and ensure the Home Point GPS is locked before takeoff. If you move away from the takeoff point you’ll want to reset your home point. This is especially important for boats or when in movement.
While RTH can be a great tool for CRM, you’ll almost always want to cancel RTH when out of trouble and hand fly the landing. RTH is not perfect and can land your drone upon landing if you’re not careful.
Photography
Exposure
How the drones fixed aperature works. Basic photo stuff with iso, aperature, shutter speed and references.
The zone system
Digital photography may not use silver negatives, paper and darkrooms, but the zone system is still relative nearly 100 years later!
The Zone System is a photographic technique for determining optimal film exposure and development, formulated by Ansel Adams and Fred Archer. Adams described the Zone System as “[…] not an invention of mine; it is a codification of the principles of sensitometry, worked out by Fred Archer and myself at the Art Center School in Los Angeles, around 1939–40.”
The technique is based on the late 19th-century sensitometry studies of Hurter and Driffield. The Zone System provides photographers with a systematic method of precisely defining the relationship between the way they visualize the photographic subject and the final results. Although it originated with black-and-white sheet film, the Zone System is also applicable to roll film, both black-and-white and color, negative and reversal, and to digital photography.
ISO
ISO is a fundamental camera setting that controls the sensor’s sensitivity to light, directly affecting image brightness, quality, and noise. A lower ISO (e.g., 100-200) is used in bright conditions for maximum image quality, while a higher ISO (e.g., 1600+) enables shooting in low-light environments but introduces digital noise or “grain”.
Auto Mode
In auto mode the ISO and shutter speed are controlled automatically by the camera. This approach generally produces good results, but it’s important to understand the limitations.
When your camera is in “Auto” mode, its internal light meter calculates the exposure by scanning the scene and mathematically averaging the brightness of all pixels to a “middle gray” (about 18% gray). It essentially adjusts your camera’s settings to achieve this standard, balanced brightness across the entire frame. — https://www.youtube.com/watch?v=H1l7mV2y-zI&t=65s
In a way, auto mode can rob your content of its highs and lows as it constantly tries to even everything out.
When to use auto mode
- Short clips,
- Fast subjects
- Rapidly changing light
When results might be less ideal
- Snow
- Reflections on glass or water
- When the frame moves rapidly between the ground and sky .
- Fog, Mist
Pro Mode
There are times when you don’t want the camera averaging everything together.
When using a fixed shutter speed you may encounter situations where you settings end up with either blown out or underexposed content before the recording ends. Sunrises and sunsets are the primary consideration.
Ask yourself ‘what is the sun likely to do in the next half hour’ and plan accordingly. Is the sun going to get very bright? Consider increasing the shutter speed.
Is the light going to leave soon? Slow down the shutter or increase the ISO.
<link to fog video ruined by auto mode>
Shutter speeds
When capturing video, videographers generally strive for natural motion blur to make the movement look smooth and realistic to the human eye.
- The 180-Degree Shutter Rule: To achieve this cinematic look, your shutter speed should be roughly double your frame rate. If you are filming at 24 or 30 frames per second (fps), your shutter speed should be set to 1/50 or 1/60 of a second, respectively.
- ND Filters are Essential: Because flying in daylight requires a very fast shutter speed to avoid overexposing the image, you will likely need to use Neutral Density (ND) filters on your drone’s lens. These act as sunglasses for the camera, cutting down the amount of light entering the sensor and allowing you to maintain that slower shutter speed.
- No Motion Blur (Too Fast): If your shutter speed is too fast (e.g., 1/1000s), your video will appear jittery or “choppy,” because each individual frame is perfectly sharp.
Motion Blur in Drone Mapping & Photogrammetry (Unwanted)
If you are using a drone to capture 2D or 3D maps, motion blur (often called “ground smear”) is an enemy of accuracy. It degrades image clarity and makes it difficult for photogrammetry software to stitch images together properly. [1, 2, 3, 4, 5]
- The Rule of Thumb: Your camera’s motion blur (the distance the aircraft travels during exposure) should not exceed your Ground Sampling Distance (GSD)—the real-world distance between two adjacent pixels in your image.
- Calculating Motion Blur: You can roughly calculate blur by multiplying your drone’s flight speed by the shutter speed. For example, if you fly at 10 meters per second with a shutter speed of \(1/100\)th of a second, your camera travels 10 cm during that single exposure.
The 180 Rule for cinematic shutter speeds
- For 30fps, use 1/60 sec
- For 60fps, use 1/120 sec
FOCUS
(mf, af, how to focus)
Light and the Sun
(Sun intro, sunset, sunrise. )
When in doubt, underexpose. You can always brighten the footage later but you won’t be able to add lost detail if the scene is too bright.
Avoid shooting into the sun if you can avoid it. When necessary use ND filters to darken the view, but this doesn’t mean you still can’t get blown out footage.
Composition
This part is actually pretty important. You can always adjust lighting and color values in the editor, but if you don’t have the right stuff in the frame you’re going to have a bad time.
Fill the frame!
Ask yourself, what is it that you’re attempting to showcase? The barn in the field? The clouds? The entire overall scene?
There’s always a compromise..
Want to show the whole scene? You’re potentially not filling the frame with whats important? Want to focus on one element? You’re missing the whole scene.
Sometimes you want to be at either extreme, sometimes you want to be right in the middle. There’s no right or wrong, just be aware of the reasons behind your decision.
The Rule of 3rds
The rule of thirds is a fundamental composition guideline that divides your frame into a (3×3) grid with two horizontal and two vertical lines. By aligning your subject along these lines or at their intersections, you create dynamic, visually balanced images that naturally draw the viewer’s eye.
AEB
Auto Exposure Bracketing (AEB) is a camera feature that automatically captures three (or more) consecutive images of the same scene at different exposure levels – typically one under-exposed, one properly exposed, and one over-exposed. It is essential for creating high-dynamic-range (HDR) images in tricky lighting, allowing photographers to select the best shot or blend them later to capture highlights and shadows
Panoramas
It’s not hard to shoot a few panorama photos along with video. This is something to do at the end of a session to maximize your last few minutes of battery life.
Videography
(Intro)
- Stable approach techniques
- Cinema mode for smoothness and safety
- Smooth movements
- Don’t get the drone shadow, unless intended
- Motion blur considerations
- Don’t make the viewer sick
- 180 rule for film composition
Tips: Filming video
- Always be recording!
- Stop and start recording in between major scenes. This will begin a new file and help you later when it comes time to edit. This also helps to prevent corrupt files
- Are you really recording? It’s easy for recording to stop or never be restarted!
Gimbal Control
Manipulating the gimbal is one of the more challenging aspects of filming drone video.
Use very subtle gimbal movements, it helps to lock your left index finger firmly on the dial and pull down or up ever so slightly. It’s easy to abuse the controls, leading to jerky footage.
The wind can impact the gimbals ability to stabilize the camera enough to safely fly via the controller screen. In these circumstances it is best to not panic and fly the drone visually without use of the screen.
These drones can handle some relatively strong winds, but when the gimbal starts jerking around its generally time to get home. See also: Wind
Common Mistakes
Some pet peeves
- Using auto exposure and not properly lighting the subject
- Jerky, sickening movements that include more than 180 degrees of movement
- No basic post processing. Not every video needs to be cinema but at least tweak the basic values
- No editing. A lot of flying is boring and people have limited time and attention spans. Nobody is going to watch a video longer than 5 minutes.
- Content shot from far away. Just because youre in the air doesn’t mean you always need to be at 399 feet!
Workflow
Plan your storage
Understanding the best practices for handling operating system files is probably the last things you’re worried about right now. Its easy to generate ~ 40GB of media per flight. Multiply that by weeks and months and you’re into terabytes of storage.
Plan a digital storage system that will give you the performance and expansion that you’ll need going forward. Leverage the cloud for backup but keep local copies of everything!
Media
Name all of your SD media similarly. For example, label mine as ‘DJI‘ but you could use something like ‘DRONE‘ or ‘FLIGHT‘. Whenever a card is mounted on my computer the files are always in the same place (/Volumes/DJI on a mac). This is especially important if you’re doing any sort of automation where your code needs to know how to find your files!
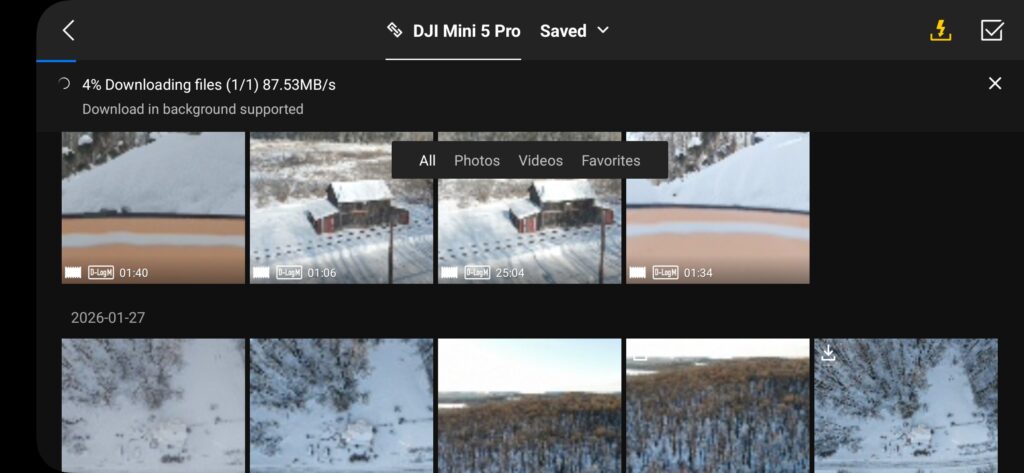
In the field
- Transfer files wirelessly via Quick Transfer
- Produce content with your video editor
The office
- Copy files via Micro SD to dedicated local storage.
- Sync local storage to cloud for backup.
- Import media into content management system
- Order props, charge batteries, order supplies, batteries, etc.
Tips: housekeeping
Prune junk footage early in the process before those files are needlessly replicated to across your storage system. These are photos and videos that you don’t want to save, obvious junk, mis-exposed footage, uneventful takeoffs and landings.
Files
Files are found in the DCIM folder on the SD card. There are differences in the way files are generated between the Mini3, Mini4 and Mini5 Pro models.
The Mini3 & Mini4 generate fixed size files (typically in ~ 3GB chunks). For these drones the amount of footage per file is determined by video quality, frame rate, etc.
The Mini5 creates a single huge continuous file which is advantageous for a few reasons. First you have fewer moving parts and clips to deal with when editing. Next, you can shoot longer videos in auto mode without annoying flashes in between files.
The negative is that your software systems need to support such large files.
Metadata
The aircraft saves flight metadata embedded in your media files using EXIF . These fields can be edited and viewed with standard editing software as well as with tools such as ImageMagick.
Similar to content created with a mobile device or regular non-flying camera, this information can be used to compromise your privacy. Be sure to strip these headers if you’re concerned about revealing times or locations!
$ exiftool DJI_20251114102021_0010_D.MP4
File Name                       : DJI_20251114XXX.MP4
File Size                       : 39 MB
File Permissions                : -rwxrwxrwx
MIME Type                       : video/mp4
Media Data Size                 : 37514139
Movie Header Version            : 0
Create Date                     : 2025:11:14 15:20:21
Modify Date                     : 2025:11:14 15:20:21
Time Scale                      : 60000
Duration                        : 2.19 s
Track Create Date               : 2025:11:14 15:20:21
Track Modify Date               : 2025:11:14 15:20:21
Track ID                        : 1
Track Duration                  : 2.19 s
Track Layer                     : 0
Track Volume                    : 0.00%
Image Width                     : 3840
Image Height                    : 2160
Compressor ID                   : hvc1
Source Image Width              : 3840
Source Image Height             : 2160
Video Frame Rate                : 59.94
Handler Description             : DJI dbgi
Encoder                         : DJI Mini4 Pro
Image Size                      : 3840x2160
Megapixels                      : 8.3
Avg Bitrate                     : 137 Mbps
Rotation                        : 0
(Example video with vod metadata displayed)
(Command to remove md)
.MP4
DJI drones record video in MP4 (or MOV) containers using H.264 (AVC) or H.265 (HEVC) codecs, offering up to 4K resolution at high bitrates (up to 150 Mbps on newer models). These files typically support 8-bit or 10-bit color, along with D-Log M or HLG.
.LRF
Low-Resolution File (LRF) that serves as a proxy for your main video recording. These compressed files are automatically generated to enable quick playback and editing on mobile devices and to make the transfer process faster by downloading smaller files first. While the main purpose is preview, you can rename the extension from .lrf to .mp4 to use these low-definition versions in editing software, especially on less powerful computers. “
.SRT
A DJI SRT file is a plain text file that contains flight telemetry data, such as GPS coordinates, altitude, and camera settings, for a video clip. These files are automatically generated alongside the video if “Video Captions” is enabled in the DJI app. They can be used to display this data as subtitles, recreate the drone’s flight path, or be processed further for mapping and other applications.
.DNG
DNG file is a Digital Negative, which is DJI’s format for storing minimally processed, high-quality RAW image data directly from the drone’s camera sensor, offering maximum flexibility but requiring post-processing to look good, unlike JPEGs which are already processed. These large files contain much more detail, allowing for significant adjustments to exposure, color, and contrast without quality loss, and can be converted to other formats.
File Naming
Files may have different names depending upon the way they’re transferred.
Raw files on SD media
DJI_20251204091811_0042_D.LRF
DJI_20251204091811_0042_D.MP4
DJI_20251204091811_0042_D.SRT
DJI Fly file naming
dji_fly_20250511_83033561_video.mp4
dji_fly_20250625_085906_0013_1750861625537_pano.jpg
Tips: File naming
- Do not completely rename files. If you really need to change a filename, leave the original filename in the new name. For example DJI_2023XXX.jpg might become Nice_Clouds_DJI_2023XXX.jpg
- Use a consistent, date based naming format for everything you do. Begin all filenames with YYYYMMDD. This will help you to sort and locate content in the future.
- Do not use spaces and special characters in path names.
Wireless Transfer
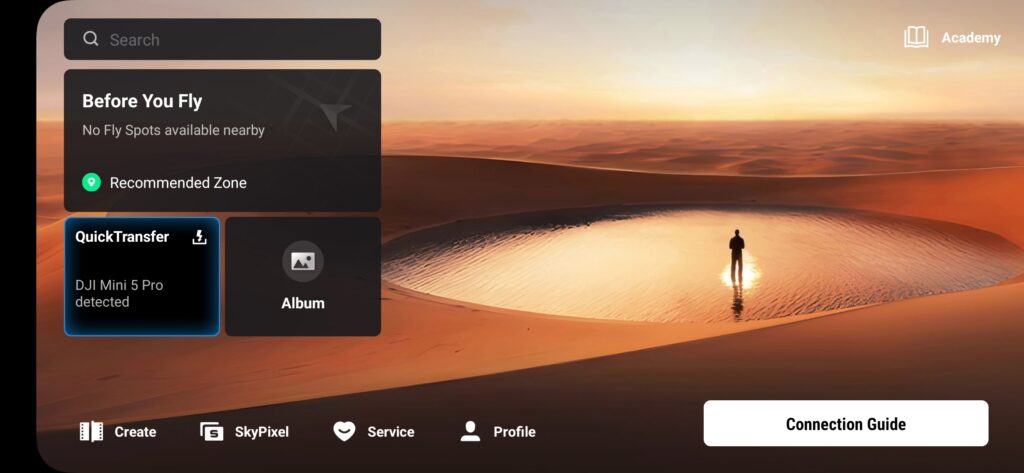
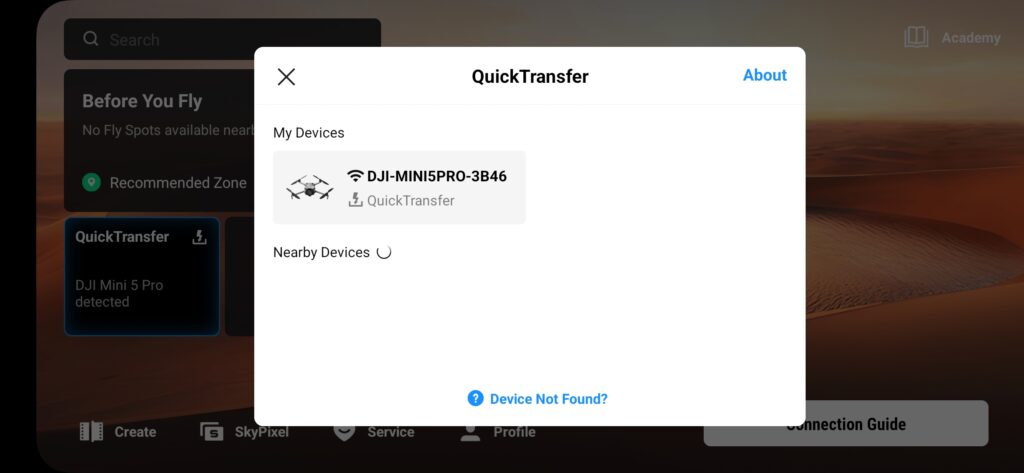
DJI Quick Transfer is a fast way to copy content directly off of your drone. This is especially useful in the field, giving you immediate access to your content. The software uses Bluetooth and WIFI to transfer files using the DJI Fly app. It also works with the DJI RC, however that is less useful than having the files on your mobile device.
Note that you’ll need to dedicate your WIFI and Bluetooth connections to Quick Transfer. If you don’t have traditional cell service and rely upon wifi calling this will force your mobile device will go offline.
DJI has more information available about exporting files.
Data Security
Consider that losing your drone means losing your data, which includes any “deleted” files that may physically still be recoverable from the card.
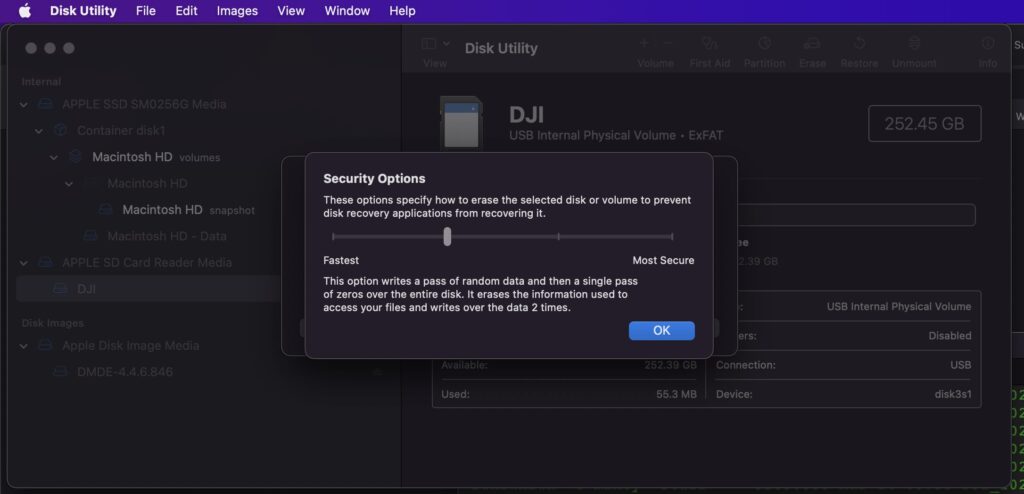
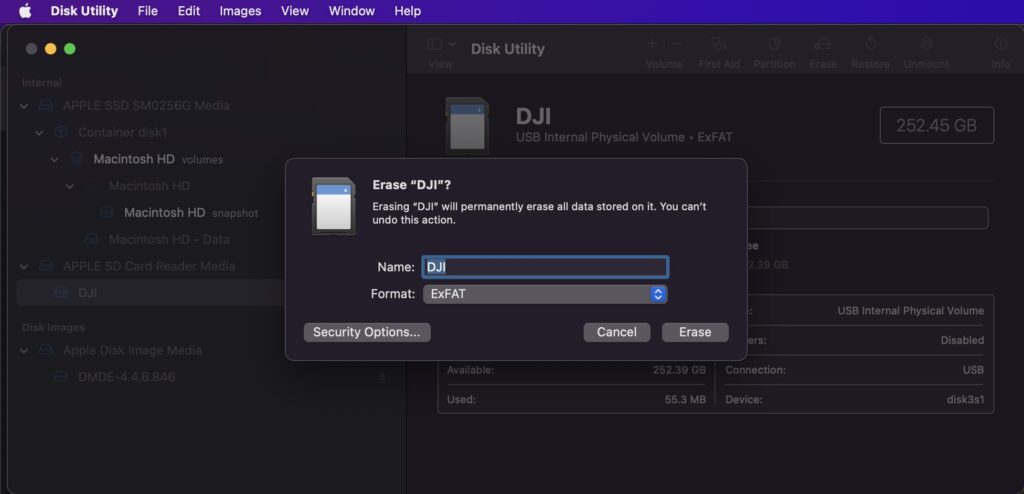
It may make sense to periodically format+overwrite your media cards from time to time depending upon your security requirements.
Here’s how to format and erase an SD card on a Mac using Disk Utility. Notice the media label name, ‘DJI‘ .
Even when not actively working on a mission there are going to be tasks to perform.
This might be offloading media to local storage, importing media into CMS platforms, charging batteries and performing backups.
Background Tasks
Software and database updates are another thankless chore that fall into this category. You don’t want to be in the field installing updates, especially when you have no connectivity!
Video Production
Video production can easily consume hours of your time. This is as skill that requires a lot of practice to master. This is yet another reason to get out and fly as much as possible.
It’s challenging to produce content that is concise and detailed enough for short attention spans, yet long enough to appease the algos and folks who really want to see more of your work, or use it for different purposes! If you ever feel divided in the editing room it might be a good time to duplicate the project and do versions for different audiences. You might make a fast 30-60 second clip for social media and a realtime version for folks who desire longer content. You might also want to create versions with different aspect ratios for various platforms.
You don’t need fancy editing hardware or software to get started using CapCut. The platform also has a bundled cloud storage solution built-in, which makes collaboration and editing across multiple devices easy.
Not all content is worth publishing
Sometimes despite your best efforts the video you shot just isn’t that great, even after editing tricks. You might want to consider deleting the files and moving on. This will declutter your archive and save storage for better content.
Edit, edit, edit!
KISS – Keep it short stupid . Pare your clips down to the absolute bare minimum you need to highlight the best parts!
Basic VIDEO tweaKs
Your editing software will give you a zillion different color options, but these are the few that I routinely tweak
- Brightness: Hopefully if you were on the safe side your content will always be slightly underexposed, especially in bright environments. Bring up the brightness until none of the whites are blown out
- Contrast: A slight contrast adjustment can help add texture to pure black areas
- Saturation: Saturation is a simple way to enhance colors in your footage
- Exposure: Worth a consideration, especially if things are really over or underexposed
- Temperature: Use this sparingly to warm up or cool down the colors in your scene
Stabilization
<what where whys of post-production stabilization, when to use, when not to use, drawbacks: cpu, clipping>
Video editing software analyzes your video clips. The software tracks specific points in the background, digitally warps or aligns the frames across a smooth path, and slightly crops the outer edges of the video to hide any black bars that appear as the frame moves.
Whether applying stabilization in-camera or in post-production, the process always involves cropping into the original frame. This can result in a slight loss of video resolution or a “jello” / “warping” effect around the edges of the video if the footage is exceptionally shaky.
Time Lapse Video
Time lapse video is a fun way to capture the changing environment. I find that shooting about 15 minutes of a scene is generally enough, though it never hurts to have extra footage in the editing room.
Tips: Time lapse
- Use Pro mode for longer content, especially on the Mini3 and Mini4. Auto mode will cause the scene to be re-metered each time a new file is written. This can cause unpleasant flashing between files. The Mini5 writes long video in a single file, which may make it more friendly in auto mode.
- The gimbal can only stabilize so much. You will get bouncy, jerky footage in very windy conditions.
- Be sure to stabilize in post processing. This will sacrifice the edges of your content for smoother video .
Sound
These drones do not record sound, but you can add some to your videos using a device such as the DJI MIC .
Choosing copyright free audio is virtually impossible on platforms like YouTube where cover free works are illegally claimed.
Wildlife
Birds
Birds are always a factor while flying. My primary flight environment is rural and hosts thousands of local and migratory birds. The animals (especially hawks) are curious but I’ve had no incidents to date. When in doubt, use your camera’s zoom function to get footage without disturbing anything.
Ascend quickly and straight up to flee from any birds that are at risk of impacting your flight. There is some unscientific indication that red reflective tape will also ward away birds.
Dogs
Dogs & coyotes are especially sensitive to drone noise. If theres a dog nearby it would probably be a bad idea to land anywhere an animal can attack. Your vehicle’s roof may be a good option here if you have that available.
People
The average person does not appreciate nor understand drones.
Having uninvolved people nearby is also a distraction as well as a potential safety risk.
Tips: Flying near people
- If they can’t see you they can’t complain.
- Do your planning ahead of time.
- Keep it quick. Get in and out!
- Avoid flying over uninvolved parties
- Give yourself more landing time just in case a random person or vehicle wanders into the landing area, maybe you need time to replan the touchdown
Remote/rural operations
<whats different, hostile environments, people, hi viz. people who may be even less happy to see you.>
If you’re in the field on a property, get an app like Acres to make sure you dont stray across boundaries! Pre-download your flight plans, dronelink flights, google maps and navigation details.
Look official! Bring a clipboard (very useful anyways), wear hi vis. Consider affixing an official looking vehicle magnet if youre going to be on the road a lot A blinking strobe might add to the mystique.
Software
Do not install new firmware or applications until they have been thoroughly tested by the community. This holds especially true right before you need to fly a mission. Be sure to check the release notes before you install new software!
Automation
Commandline
Eject storage on a Mac:
diskutil eject /Volumes/DJISync a local directory with another using rsync
rsync -avpor /Volumes/DJI /Volumes/Backup/20251202-autumn-photosSync a local directory with a remote directory using rsync over ssh.
$ rsync -avpor -e ssh /Volumes/DJI/DCIM/ /Volumes/Backup/20251202-autumn-photosGenerate MD5 checksums (perhaps to identify duplicates?)
md5sum DJI*{G,4}

6ba3c83552fd1cd111de8c0a5f82baa1 DJI_20251007061336_0037_D.JPG
868eb761167deb002b4c3276efb4d435 DJI_20251217155205_0029_D.MP4
FFmpegthumbnailer https://github.com/dirkvdb/ffmpegthumbnailer
ffmpegthumbnailer -i input_video.mp4 -o thumbnail.jpg
ffmpegthumbnailer -i input_video.mp4 -o thumbnail.jpg -s 640 -t 20
ffmpegthumbnailer -i input_video.mp4 -o thumb.png -s 0 -q 10 -f -m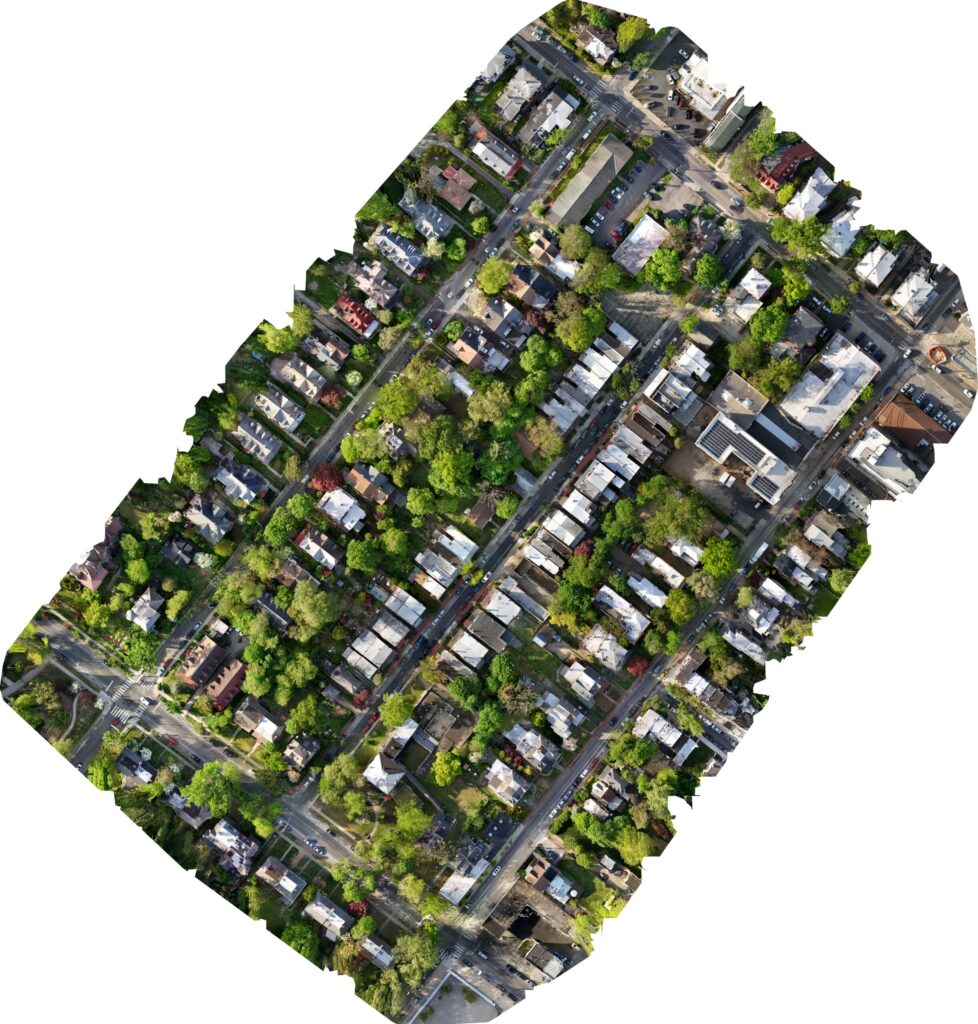
About the author
Michael Jastremski is a Part 107 certified drone pilot in North East Pennsylvania. He has been involved with photography for over 30 years and drones for 8.
This guide is licensed CC BY-SA 4.0Contact ([email protected])